Oracle SOA Suite Online Training

Interested in learning Oracle SOA Suite 12c?
Learn from the author of this blog!
A complete and comprehensive course on the #1 platform on SOA - Oracle SOA Suite

Click here to find the complete course details
Click here to check the first session on Oracle SOA Suite 12c

================================================================================================

Using properties in Composite (or) Using Properties in BPEL

Hello

This post will take you through a demonstration on how to setup and use properties in a Composite

Often you'll have scenarios where you'll need to change/setup certain values at runtime. For ex, adminEmailAddress. During dev, usually the developer would use his mailId but when deployed in production, the admin has to be assigned. How is this addressed?

Using Properties

1. Define properties in Composite.xml against the BPEL process in which you want to use this properties

<component name="EventProcessor" version="1.1">
      <implementation.bpel src="EventProcessor.bpel"/>
      <property name="bpel.preference.adminEmailAddress" type="xs:string" many="false">admin@xyz.com</property>
      ...
</component>
Note that bolded bpel.preference should not be changed.

2. Use this property in BPEL
For ex, in the Mail activity, the to address needs to use this value
ora:getPreference('adminEmailAddress')

3. Set this property value in EM
Go to EM --> Weblogic Domain --> rt click on soa_domain--> System MBean Browser


oracle.soa.config --> Server : <Managed Server> --> SCAComposite --> SCAComposite.SCAComponent --> Click on your Process


On the right side, click on Properties
You'll see the property adminEmailAddress,  where you can replace whatever value you want.

Thanks for reading the post.

Unable to deploy ADF UI app - java.lang.ClassNotFoundException: oracle.adf.library.webapp.ResourceServlet

You may get the following exception while deploying the ADF UI application from Jdev/WLS

Operation 'deploy' on application 'ProjectInitiate_V3_UI' has failed on 'AdminServer'
java.lang.ClassNotFoundException: oracle.adf.library.webapp.ResourceServlet
oracle.adf.library.webapp.ResourceServlet
Deploy operation failed.

Reason being the .war file that you are trying to deploy does not contain the whole lot of classes required. You make .ear file instead which has all the resources required.

The way you do it is, deploy the same at the Application level instead of Project Level from Jdev


OR

If you are deploying directly from EM/Console, deploy the .ear file instead of .war file

SOA Deployment taking indefinite time

Sometimes, you may encounter the following issue

The task cannot be processed further until the current edit session is activated. When this occurs, task processing will continue. The user can exit the deployer tool without affecting the task.

and the deployment never happens.

This happens because there you may have mistakenly/intentionally changed certain parameters in the WLS console, and did not activate/revert those. If you open the console (http://host:port/console), you see the 'Activate Changes' button enabled at the left top corner.
You just have to either activate/revert the changes, and the deployment happens now.

Runtime Operation Error in BPM - ORABPEL-30017 - Invalid task definition

Hi

When you encounter this issue of getting a 'Runtime Operation Exception' while logging into BPM Workspace, or find a similar log

ORABPEL-30017

Invalid task definition.
The task definition at default/PrjTaskReminderNotification!1.0*soa_5cb0ae06-9485-488f-91b1-1b2872276fb9/Initiator could not be read. The task definition is associated with workflow default/PrjTaskReminderNotification!1.0*soa_5cb0ae06-9485-488f-91b1-1b2872276fb9/Initiator.
Make sure that the task definition is available at the specified URL and that it is a valid XML document.


Here's the solution.
This happens when there are more than one active record in BPM_CUBE_PROCESS table.
You just have to make sure that there is only one active record per process.

Execute the following query by connecting to the SOA_INFRA schema of the database

select processId, processName, compositeName, revision, status, from BPM_CUBE_PROCESS;

If it returns multiple records for the same ProcessName, make the status of all those entries to -1,commit and redeploy the process.
Now, you can see the process in the workspace without any problem

Publish Message to JMS Queue

This post takes you through a step-by-step procedure to create a JMSAdapter that publishes a message

1. Create a new SOA Project 
2. Define a message schema of the following type

3. Drag and drop JMSAdapter from the component palette to References section of composite.xml 
4. Configure the JMSAdapter as per the screenshots given below


The below wizard is important
Select the Queue where the message is to be published(which is created in previous tutorial)
Set the TimeToLive property whose meaning is obvious. The message disappears after this time
Also, set the JNDI name of the ConnectionPool that you've created in the previous tutorial


Your composite would look like this


5. Create a one-way Mediator with the input type similar to the one for JMSAdapter(with SOAP endpoint) and wire it to the JMSAdapter


6. Composite looks like this

7. Now, open the mediator, create the transformation file in the Routing Rule and deploy

Testing
Open the composite in EM and test it (give a payload of your choice)


To check if the message is published to JMS,
Goto Services --> Messaging --> JMS Modules --> MyJMSModule --> myQueue --> Monitoring tab --> click on the Queue name --> Show Messages --> click on the message


This message stays in the queue for the time that is configured in the wizard. After that time, the message expires.

Configuring JMS Resources for JMSAdapter

This post is a step-by-step guide to configure JMS resources in Weblogic Server in order to work with JMSAdapter

Working with JMSAdapter in Oracle SOA Suite 11g involves configuration of various JMS resources in WLS

  1. JMS Module(Optional) : Is a definition that contains various JMS Resources like queues, topics, etc.
  2. Sub-Deployment(Optional) : used to group target servers
  3. Connection Factory : is a Weblogic resource that enables JMS clients to create connections to JMS destinations
  4. Queue / Topic : the actual destination of the message, either a queeu(point to point) or topic(publish-subscribe)
  5. Connection Pool : Create a pool of connections for the JMSAdapter application

Creating a JMS Module
This step is not mandatory, you can use the default module 'SOAJMSModule'
Weblogic Console --> Services --> Messaging --> JMS Module --> New --> Provide a JMS Module Name --> select the target server(to which you want to deploy this, usually the managed server where SOA is configured) --> Leave the check box(define resources in this module) --> Finish


This step creates a new JMSModule 'MyJMSModule'.

Creating a sub-deployment
Every JMSModule has to be targetted to a Sub-Deployment. A Sub-Deployment is used to group targets

Click on the just created MyJMSModule --> click on Subdeployments tab at the top --> New --> Give name to the subdeployment --> select the target (can either be a server or JMSServer. As this is specific to JMS, I've selected SOAJMSServer(default available JMS Server. You can even create your own JMSServer))


Creating a Connection Factory
A Connection Factory is used to create connections for the JMS Clients to interact with JMS Resources
Click on the just created MyJMSModule --> New --> Connection Factory --> Give name & JNDI name --> soa_server1(selected by default) --> Finish


Creating a Queue
Queue is the actual destination
Click on the just created MyJMSModule --> New --> Queue --> Give name & JNDI name --> select subdeployment --> Finish


This sets up all the JMS Resources.

You are still left with one configuration to be done to use this queue with a JMS Adapter, which is creating an outbound connection pool
For this, go to Deployments --> JMSAdapter --> Configuration --> Outbound Connection Pools --> New --> oracle.tip.adapter.jms.IJmsConnectionFactory --> Next --> Provide JNDI Name for the Connection Pool(This will be used in the JMSAdapter configuration in the Composite)
This will create a Connection Pool, but Connection Factory(the resource used to connect to Queue) is not yet configured, which is done in the next step


Click on the just created connection pool --> enter the ConnectionFactoryLocation as the JNDI name that you've created in Step 2 (which is jms/myConnFactory and hit Enter) --> Save

Update the JMSAdapter deployment
Console --> Deployments --> click on JmsAdapter checkbox --> Update --> select defaults --> Finish

Now, you can use the ConnectionPool name eis/jms/myConnPool in the dbAdapter in your SOA Composite
If you get any error saying the connectionPool not found, restart the SOA Server

Please read the next post on working with JMS Adapter

Multi-Instance Processing in BPM - Iterating over Arrays in BPM

It is often a common scenario to trigger multiple instances of a particular part of a BPM process. A typical example would be
You have an array as input, and the same process to run for each of the element set in this array(each element may refer to a particular user tasks)
OR

Every night, a batch process to run and each of the managers in the organization to be notified with the to-be-reviewed activities assigned to them ie, each person should be notified only with his tasks which requires a particular process to be run for each of the managers

NOTE :
This post specifically applies to Oracle BPM Suite 11g 11.1.1.5, before the FeaturePack(FP). In this version, the LoopCounter Variable in the subprocess is not visible, which is a bug. And this post is the workaround for that.
Post FeaturePack release, the variable is available in the Sub-Process, so the process of assigning the individual input in the script task at the starting of the Sub-Process is not required. I'll write another blog for it.

In this example,
 there are several managers, and a separate instance of the sub-process(shown below) is to be triggered to each of the managers, paralelly


Input to the sub-process has to be of type Array – thumb rule ;) – as only then, you can split the data  and make each of the instances get corresponding data
Schema for the input to the sub-process is given at the end of the post

There is a way to instantiate parallel processes in BPM, and that’s called MultiInstance invocations
1.       Create a sub-process and, create the activities that are required to repeat for each manager
2.       Now, this should be invoked for all the elements in the array. So some configuration  to be done to the sub-process property
My process looked like below

3.       Double click the sub-process à


Select multiinstance as loop characteristic
Cardinality is no. of instances to be produced, here it is count (allActivities.reviewerWiseActivities, which otherwise is equal to no. of managers - with tasks)
Uncheck Is Sequencial
Don’t touch Arguments definition tab, as since this is a pre-Feature pack release, there is a bug and you cannot go with the standard way
1.       Input to the sub process is an array, but typically each manager has to be assigned only with his tasks, which will be one element in the array. So use a script task as the first activity in the sub-process and copy nth element from the array and assign it to sub-process dataobject


Here, the value in the left box is :: AllActivitiesPDO.reviewerWiseActivities[loopCounter] which is obvious to understand.

Bug in Pre-Feature pack release is that this loop counter is not available in the properties window of the sub process. That’s the reason, we are splitting the array within the subprocess but not before invoking the subprocess.
Had this been post Feature pack release, you can split the array in the properties window of the subprocess, define input and output elements, and skip this script task.

That’s it! Now, n number of sub process instances will start paralelly

Hope this is useful J

BPM - UCM Integration : Human Task Attachments(stored in UCM)

This post deals with Human Task attachments stored in UCM

This post applies specifically to Oracle BPM Suite 11g 11.1.1.5 Version before the FeaturePack, which is otherwise called PS4(Pure Vanilla BPM PS4)

UCM Integration with BPM is inbuilt from PS5 onwards(the document tab in the Human Task and some configuration in EM), but till PS4 there is no direct provision to talk to the UCM store. It has to be invoked just as any other web service, get the content and operate on it.

Human Task attachments is such a common scenario, and the attachments are normally fetched from some content repo like UCM.
How do we get the content from UCM and attach it to the Human Task so that the participant that acts on the task will have the attachments in his taskform/Email.

UCM - as such - provides various WebServices to deal with various operations. List of WebServices can be seen in its documentaion

This post deals with the GetFile WebService of UCM(http://docs.oracle.com/cd/E17904_01/doc.1111/e11011/c05_core.htm#BABFDEFH) which, as the name implies, is used to retrieve the content stored in UCM

First, login to the UCM console, and click on ------------, get the WSDL in to the project OR create a reference to it.
This WebService has an operation that takes in 3 parameters. Often, we deal with only one parameter from the list(either the documentId or documentName(in UCM)), with other two as null.
But there is a bug in the WebService where if you pass a payload similar to
<.....>
<docId>1232</docId>
<docName/>
<RevisionSelectionMethod/>
</.....>

the service returns error - inspite of the fact that you've passed the correct docId of the document you want to retrieve.
Workaround for this is to remove the empty tags completely which you cannot directly make in the invoke activity, so use a mediator before the call in which you remove out the not required tags(in the routing rule transformation - by not mapping these two)

A screenshot of the same


Once this is done, the webservice returns a result which is the content of the document, which you need to assign to the attachments part of the execData of the HumanTask.

Hope this gave you an understanding of how to retrieve the documents from UCM (in PS4)

The next post is about dealing with multiple attachments in Human Tasks

Project Data Objects are not Global!

There are 2 types of variables that you can define in BPM Processes

Process Data Objects
       That can be shared across activities in a process. There is no confusion in this I hope.

Project Data Object
       This can be thought of as a 'Global Variable' that are shared across processes in a BPM Project and carry the same value across Processes. But this is NOT TRUE. We use Project Data Objects when the same variable is used across Projects. For example, a variable empId is required across multiple processes you have in a BPM Project, but each project holds its own values, then instead of defining the same object as Process Data Object in every process, one Project Data Object should be sufficient.

Hope this clears the myth !

Cleared Oracle BPM Certification

I've done my Oracle BPM Certification (IZ0 560) today, and want to share my learning path for the certification.

Fortunately, I had a chance to work on a highly customized BPM project for about 2 months which gave me a great insight into Oracle BPM Suite 11g and all its features, which helped me a lot to prepare for the certification.

But for those who didn't have any real time experience on BPM Projects, for those who are practicing on their own, I would suggest the following path

First of all, Start with the basic BPM tutorial by Oracle
http://www.oracle.com/webfolder/technetwork/tutorials/obe/fmw/obpm/11g/r1/firstProcess/firstprocess_obpm11g.htm

This example gives you a basic foundation on the BPM Suite and its modelling capabilities.
Once you are done with this, its time for you to take a deep dive into the Suite
This books works on a single, big project that covers almost all the features of the Suite
http://www.oracle.com/technetwork/middleware/bpm/learnmore/default-171759.html

Though it takes some time, do not skip it, this is the best book for beginners to get a good knowledge and learning experience on the entire Suite.

Once you are done, thats it! You are almost ready for the exam
Look at the certification link for the list of topics and see if you've covered all these.

Note that if you are well versed with SOA Suite, learning BPM and getting certified would be a cakewalk, provided you put some effort.

Measurement Mark in Process Analytics - Explained!

'Measure Business Indicator' and 'Measurement Mark' is often a topic of confusion. So let me explain them in detail

A business Indicator in BPM is nothing but a Project Data Object that can be used to capture information from your BPM Process to be sent to Process Analytics Databases / BAM Databases that Process Analysts can use to monitor your processes

A Business Indicator can be of the following types
  • Measure
  • Dimension
  • Counter
This post completely discusses about Measure

A Measure Business Indicator is used to capture something that can be measured.
Ex : The discount given to a party

There are few pre-defined Measure Business Indicators defined.
  • Number of activity instances by activity, process and participant
  • Avg time to complete an Activity
  • Avg time to complete a Process
Apart from these, you can always define your own Measure Business Indicator, just as in the abouve example, Measure to capture 'discount given to a party'

Now, If the Measure Business Indicator captures this value, then why again Measurement Mark?


Measurement marks enable you to measure a business indicator of type measure at a certain point in the process
Single Measurement
Interval Start
Interval Stop

Explanation in detail
Whatever you want to measure, you have to define a measure Business Indicator first.
Lets say, in your process, there are 10 activities, and say
At activity1, you want to measure discountAmt (measure Business Indicator(BI) name : discMeasure)
At activity2, you want to measure salary (measure Business Indicator(BI) name : salMeasure)
At activity3, you want to measure someotherthing (measure Business Indicator(BI) name : someMeasure)
 and so on…
Now, you have to create measure type Business Indicators corresponding to all these measures you want to measure. End of the day, all these become project data objects that hold values

Now, storing salMeasure, someMeasure at activity1 doesn't make sense, as these values are not available yet. At activity1, saving discMeasure only makes sense
So, how do you say the BPMN service engine to store only discMeasure at Activity1, and similarly only salMeasure at Activity2, and so on…
This is done using Measurement Mark
A measurement mark tells the service engine what all measures to be stored into the process analytics/BAM databases
A measurement mark associates measures at a particular point(in this case, discMeasure to Activity1)
Along with storing the measure BI's selected, all the default measures and dimensions are also stored

Process to add a Measurement Mark
  1. Pre - req : Identify what all measures to be captured, define corresponding Measure BI's in the structure pane. Also define corresponding Dimensions that may be used to group these measures later in the dashboards
  2. Where ever you want to measure something, drag and drop 'Measurement' activity from the component pallette
  3. Give a name, select the measure BI's to be stored

Interval Start and Interval Stop Measurement is used when you want to capture data from a section of the process
The start and end points of the process that you want to capture is identified using these two measurement marks. And even here, you need to associate all the measure BI's that you want to be stored at that point

Hope this made you clear on the topic of Measure and Measurement Mark

Exception while deploying UI project associated with a Human Task

Hi

You may sometimes encounter an exception while deploying the ADF UI project associated with a Human Task.

Exception looks like this:

Weblogic Server Exception: weblogic.application.ModuleException:
Caused by: weblogic.common.ResourceException: java.security.PrivilegedActionException: weblogic.common.ResourceException: java.security.PrivilegedActionException: weblogic.common.ResourceException: No credential mapper entry found for password indirection user=hr for data source Connection1
  See server logs or server console for more details.
weblogic.application.ModuleException:
Taskflow deployment failed to deploy to server. Remote deployment failed
####  Deployment incomplete.  ####
Remote deployment failed (oracle.jdevimpl.deploy.common.Jsr88RemoteDeployer)


To resolve this, just remove the reference to 'Connection1'(as indicated in the exception trace) from the connections.xml file. This can happen when you create the connection with that name, and later on, remove it.

Just remove the whole <Reference> tag for this connection. And it gets deployed this time.
Hope this helps you resolve the issue.

My Notes - 'Message throw & catch' VS 'Message Send & Receive' tasks - Oracle BPM Suite 11g

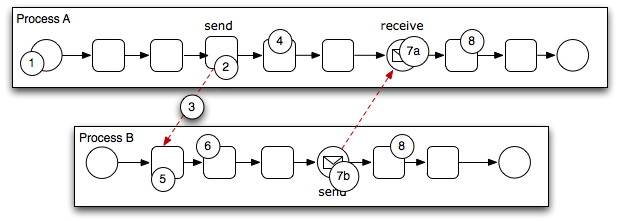
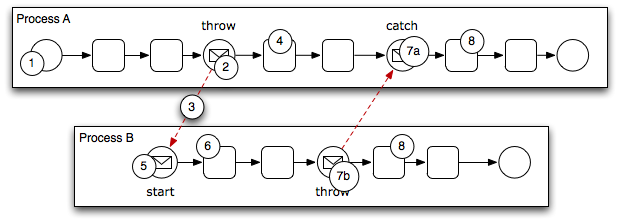
Both 'Message throw & catch' VS 'Message Send & Receive' tasks are used to invoke services/Processes asynchronously. That is, once a throw task is executed or a Send task is executed, the token does not wait for the response, rather, it continues to the next task.

Both act almost similarly, however there is a slight difference

You cannot use a Send task to invoke a process that is instantiated with a message start event
AND
You cannot use a throw task to invoke a process that is instantiated with a Message Receive task

All the 4 tasks can be at any place with in a process.
A process can be started using a Message Receive task / Message Catch Event
And at the same time, a Message Receive task / Message Catch Event can even be in mid-process

When a process encounters one of these 2 in the middle of the process, the token waits at that point till it receives that message(from either a Throw task or a Send task)

Message Send and Receive : these tasks can be at any position of the process
Description of Figure 6-22 follows

Message throw and catch task : These tasks can be at any position of the process
Description of Figure 6-25 follows

My Notes - Manual Task :: Oracle BPM Suite 11g

Manual task is something which is not managed by BPM runtime, but stil you may want to represent a particular manual activity in BPMN diagram.
For example, in a process, there may be a step where you need signature of the management after all the approvals, which is to be done specifically, seperate from BPM, meaning you need to take out the printout, sign it and submit. This is where a Manual task can be used. This doens't do anything with respect to BPM runtime, but acts as a place holder for some human Intervention.

Starting a BPM Process : Oracle BPM Suite 11g

A BPM Process can be started/triggered in one of the following ways

1. A Start event of type Message / Signal / Timer
2. A none start event followed by a User task with Initiator pattern
3. A none start event followed by a Receive Task. The Receive task must be configured to create a process instance(Instantiate property set)

You can even have a combination of the listed ways to start a process, in which case the process has multiple start events

When creating a process that has multiple end events, you must ensure that any tokens that reach a message end event were created by a message start. Ex, you cannot have a Message End Event for a process that starts with Timer Start Event

Manual Process VS Reusable Process : Oracle BPM Suite 11g

When you try to create a BPM Process, the editor gives you 4 options
Synchronous Process
Asynchronous Process
Manual Process
Reusable Process

The first 2 are obvious, with begin and end activities as 'Message Type'
But both Manual and Reusable processes has begin and end activities as 'None Events'. If both are same, then why two different options?

There is a difference

The Manual Process, though the start event is a None Event, has an Initiator node that starts the process. Also, A manual process' start event can be transformed into another type. Also, there can be multiple start events to the same process.
On the other hand, the Reusable Process starts with a None start event. And there wont be an initiator after that. If any initiator node is added, or the start event is changed, this no longer becomes a reusable process. A Reusable Process can be called from a 'Call' Activity

Grouping XML elelments using XSLT - xsl:for-each-group

This is an informal post on XSLT for-each-group which is very powerful function to group xml elements based on some criteria.

For Ex, you may want to convert a flat structure, typically returned by DB into an xml which is, say department wise. for-each-group is what you want

This sample is to convert a flat structure into a projectOwner wise grouping

Input

<MailPayload>                              
    <ActivityPayload>                              
        <ActivityId>101</ActivityId>      
        <ActivityName>T1</ActivityName>      
        <ActivityOwner>Act1Owner</ActivityOwner>      
        <ProjectId>1001</ProjectId>          
        <ProjectName>Prj1</ProjectName>      
        <ProjectOwner>PrjOwner</ProjectOwner>      
        <ApprovalStatus>some desc 1</ApprovalStatus>
        <Comments>comments1</Comments>
    </ActivityPayload>                              
    <ActivityPayload>                              
        <ActivityId>102</ActivityId>      
        <ActivityName>T2</ActivityName>      
        <ActivityOwner>Act2Owner</ActivityOwner>      
        <ProjectId>1002</ProjectId>          
        <ProjectName>Prj2</ProjectName>      
        <ProjectOwner>PrjOwner</ProjectOwner>      
        <ApprovalStatus>some desc 2</ApprovalStatus>
        <Comments>comments2</Comments>
    </ActivityPayload>                              
</MailPayload>

Ouput Format required

<?xml version="1.0" encoding="UTF-8"?>
<MailPayload>
<ProjectOwnerWise>
<ProjectOwner>PrjOwner</ProjectOwner>
<Activities>
<IndActivity>
<ActivityId>101</ActivityId>
<ActivityName>T1</ActivityName>
<ProjectId>1001</ProjectId>
<ProjectName>Prj1</ProjectName>
<Comments>comments1</Comments>
</IndActivity>
<IndActivity>
<ActivityId>102</ActivityId>
<ActivityName>T2</ActivityName>
<ProjectId>1002</ProjectId>
<ProjectName>Prj2</ProjectName>
<Comments>comments2</Comments>
</IndActivity>
</Activities>
</ProjectOwnerWise>
<ProjectOwnerWise>
<ProjectOwner>PrjOwner2</ProjectOwner>
<Activities>
<IndActivity>
<ActivityId>103</ActivityId>
<ActivityName>T3</ActivityName>
<ProjectId>1002</ProjectId>
<ProjectName>Prj3</ProjectName>
<Comments>comments2</Comments>
</IndActivity>
</Activities>
</ProjectOwnerWise>
</MailPayload>

XSLT
-------

<?xml version="1.0"?>
<xsl:stylesheet version="2.0" xmlns:xsl="http://www.w3.org/1999/XSL/Transform">
  <xsl:template match="/">
   <MailPayload>
<xsl:for-each-group select="/MailPayload/ActivityPayload" group-by="ProjectOwner">
   <ProjectOwnerWise>
<ProjectOwner>
 <xsl:value-of select="current-grouping-key()"/>
</ProjectOwner>
<Activities>
 <xsl:for-each select="current-group()">
  <IndActivity>
<xsl:copy-of select="ActivityId|ActivityName|ProjectId|ProjectName|ReviewerDecision|Comments"/>
  </IndActivity>
 </xsl:for-each>
</Activities>
</ProjectOwnerWise>
</xsl:for-each-group>
   </MailPayload>
  </xsl:template>
</xsl:stylesheet>

for-each-group groups the entire xml as per the group-by value defined and loads in memory
ex : <xsl:for-each-group select="/MailPayload/ActivityPayload" group-by="ProjectOwner">  -- ProjectOwner here

current-grouping-key() gives the values of all ProjectOwner
current-group() lists all the tags defined in a particular set


Importing a BPM Project into Jdeveloper


When I was doing my first project on BPM, I was asked to check some exisiting BPM Project which was sent to me as a .zip file
Now this is not in a .jar format which would have been the case with a SOA Project.
When you check a BPM Project in Jdeveloper, you see two folders, one for SOA stuff and the other for BPM. So this is organized in a different way compared to a SOA Composite
I literally had no idea how to import the source code into Jdeveloper and finally could find a simple solution

Just create the application and projects with the same name as that of the source code(from zip file). This creates a similar folder structure in your workspace. Now you can take the files from the zip and place/replace them into the folders in you workspace.
Now, when you open your Jdeveloper, you could see the entire thing setup!

Thanks for reading, Please check the other blogs as well

Customizing generated ADF task forms in Human Tasks


Many times, there are cases where you need to customize the defualt generated task forms in BPM Applications
Simple examples could be to have a list of values as a drop-down for a particular field. If this field is of type string, then the default generated task form will have a simple text box of type string. Now, this is not the thing you want, you may need a drop down here. How do you address this scenario?

Its simple, you have to know some ADF and you are done!
Open the .jspx page generated for the task form, click on the field that you want to modify, go to src and replace that with the ADF code snippet that you want

Make use of a Managed Bean where you pull the values to be displayed, then in the .jspx page, write code for the LOV that pulls values from that operation in the ManagedBean

Ex.
                    <af:selectOneChoice label="EPS Name" id="soc1" autoSubmit="true"
                                        value="#{pageFlowScope.wsAccessorBean.selEps}"
                                        valueChangeListener="#{pageFlowScope.wsAccessorBean.setEPSBindingsListener}">
                      <f:selectItems value="#{pageFlowScope.wsAccessorBean.lovValuesForEPS}"
                                     id="it13"/>
                    </af:selectOneChoice>

Invoking a Secured WebService in BPEL - Oracle SOA Suite 11g


No Webservice in real-world business applications is just exposed as it is, Security is enabled inherently
Oracle Fusion Middleware uses a policy-based model to manage and secure Web services across an organization
Policies apply security to the delivery of messages
Policies can be managed by both developers in a design-time environment and system administrators in a runtime environment

Below are the steps to invoke a secured WebService from a BPEL Process

  1. Before we start, we have to know what is the security policy imposed by the WebService. In this example, we are considering a WebService that has oracle/wss_username_token_client_policy

  1. There are 2 ways of imposing security for services in Oracle SOA Suite 11g
    1. Design Time
      1. Simply, rt click on the web service reference --> Configure WS Policies --> Select the appropriate Policy
Please note that you can select multiple policies at once, depending on the security of the WebService


This step adds the following snippet
      <wsp:PolicyReference URI="oracle/wss_username_token_client_policy" orawsp:category="security" orawsp:status="enabled"/>
  1. Run Time
    1. The same could be done at runtime using Enterprise Manager(EM)
Login to EM --> rt click on soa_infra --> configure Policies --> select the appropriate Policy
The above step creates a 'Lock' icon on top of the web service reference as shown above

  1. Open composite.xml, goto source view, find out the reference tag in the file and add the following snippet which basically tells that this particular reference is secured with so-and-so policy, and these are the credentials for invoking the same
      <property name="oracle.webservices.auth.username" type="xs:string"
                many="false" override="may">admin</property>
      <property name="oracle.webservices.auth.password" type="xs:string"
                many="false" override="may">Welcome123</property>

This will make sure the webservice is invoked using the provided credentials. And, that’s it!
Hope this gave you a clear understanding on invoking secured WebServices
Thanks for reading, Please check the other blogs as well

BPM - Primavera P6 Integration Issue - Workflow link not coming up in "My Workflows"

During Primavera P6 - BPM Integration, sometimes you may get the following scenarios

- BPM Initiator link missing in "My Workflows" link
- BPM tasks coming up in Primavera P6 BPM Portlet, but link not appearing

There may be a case where the BPM workflow is working completely fine through BPM Workspace, but from the Primavera P6 BPM portlet, you will be able to see the tasks, but you don't find a link to initiate the workflow.

If you check the Primavera P6 logs, here is what you find

ERROR com.primavera.infr.srvcs.bpm.BPMNServiceImpl ?:? BPM service could not connect to BPM Identity service provider for database 1
ORABPEL-10585
Service error.
Internal Error; Service error occurs in BPMIdentityService in method authenticateUser.
Refer to the log file that is configured for oracle.soa.services.identity for more details on this error and contact Oracle Support Services

This happens if you dont grant privileges to the jar files you've added to the Primavera P6 WLS
Just put the follwoing snippt in weblogic.policy file you find under  in your Primavera WLS

//Grant privileges to BPM
grant codeBase "file:/u200/app/GTAXAP/orgtaxap/oracle/Oracle/Middleware/11g_bpm/modules/*" {
  permission java.security.AllPermission;
};

Works like a charm, suddenly the link starts appearing in "My Workflows"

Creating a Simple BPEL Process : HelloWorld BPEL

Business Process Execution Language(BPEL) is an execution language for defining business processes. In short, it is the language for orchestrating multiple WebServices based on the business logic.

This post is about creating your first BPEL process using Oracle SOA Suite 11g

This is a simple BPEL process that gives back fullName as response, inputs being firstName & lastName

Defining your first BPEL Process
Create a new Project, name it HelloWorldBPELPrj and select Empty Composite in the next screen'
 
Define a Schema as follows
 
In the composite file, drag and drop BPEL Process component from the Component Palette into the Components swimlane of the composite.xml
This will open up a wizard where you need to give the following details
Name : HelloWorldBPEL
Template : Syncrhonous BPEL Process
Select Input and Output from the schema just created
Select the checkbox "Expose as a SOAP WebService" so that it creates a WebService with the same message types in the External References section of the composite.xml, though which external clients talk to this BPEL process

 
This will create the following in the composite.xml
 
Now that you've created the skeleton, lets implement the BPEL process.
Either open the .bpel file from the Navigator or double click the BPEL process icon in the coposite.xml - this will take you to the BPEL Component Editor where you'll implement the business logic in the BPEL process

When you look at the empty BPEL process, you'll find an incoming line from the external WS to Receive Activity, and an outgoing line from Reply Activity to the same external WS. These lines represent the flow of message to and from the WS to the BPEL Process

Note : Every operation in a BPEL process is called an Activity

Click on the "X" symbol in the boundary enclosing both the activities. The boundary is called a Scope in BPEL, which is similar to Scope in any programming language
This will open up variables section, where you'll see 2 variables (inputVariable and outputVariable). The inputVariable contains the the value coming into the BPEL process from the external WS.
In this example, inputVariable contains just a simple string, name
We need to concatenate this with 'Hello ' and assign it to the output variable. This can be done using Assign activity

Drag and drop Assign activity in between the two activities, name it AssignOutput
 
Here, we need to concatenate both the elements from the input and assign it to the output. For this, click on the Expression icon at the top right as shown

Use the concat() function from the String functions and append Hello to the name from the inputVariable, as shown
 
This will create a function icon in the middle of the Assing editor, where you need to drag this to assign it to the returnMsg of the outputVariable and click OK

With this, the outputVariable is stuffed which is sent back to the calling WS(indicated the outgoing line)
Thats it, you are done with your first BPEL process
Deploy the project as per this link and test it in Enterprise Manager

Hope this tutorial gave you a basic understanding on working with a BPEL process.

Thanks for going through my post, feel free to provide a feedback!